
| RedneckExpress | Posted on: Jul 1 2016, 12:46 AM |
|
Group: Members Posts: 42 Joined: 13-November 10 Member No.: 4,973 |
Thursday, June 30, 2016 Rebuilding Ms. Merry, the Amerigo And The Mystery of the Trampoline Floor Ive been reading George and the late Ms. Tiogas amazing story, again, as of late, and Ive always loved Georges narrative style, as he described his adventures being a Vagabonder Supreme with all his friends. So, today I decided Id try writing in his fashion, as Ive always tended to assign human qualities to a great many things that have been a part of my life and talked to them like they were people on many occasions. The Amerigo, you should already know her name, its Ms. Merry, of course! Now, Merrys Chaufer, the trusty old white Dodge pickup, might be a tad more challenging, as his name isnt really straight forward. His name is Jake, named after his Grandfather, an old red 1979 Chevy C20 Camper Special who drove Ms. Dyna around for my parents when I was a little baby. Jake, however, likes to be called Red after his nickname Redneck Express, because he thinks it makes him sound tough like a junkyard dog, though hes more like a sleepy black lab. Reds been taking care of Ms. Merry, resting on his back while she undergoes her surgery. Both of them are looking forward to when Ms. Merry is finally done, and its time for Merry, Red, Dawn and Ms. Yuki the Cat to return to the asphalt rivers once again in search of the next horizon. --------------------------------------------- When we last left off, I was showing you all the new holding tanks for Ms. Merry the Amerigo, who is still feeling rather out of sorts with her insides out and about, scattered into various unsorted piles in the barn with old Mr. Kit, who simply grumbles whenever hes woke up by me digging around looking for a bit of Ms. Merry to put back and generally mumbles something about Staying off his lawn. Today, I finally decided to tear into Ms. Merrys floor, the last big mystery left in her bare skeleton. From the day I first looked at Ms. Merry in her dusty tent up in Washington, I noticed that her floor was rather springy, like walking on a trampoline in some areas. This was very disconcerting, as no Truck Campers floor should bounce like a trampoline when you walk on it! I figured at the time the floor was either built with too thin of plywood when Ms. Merry was put together, or water had gotten into poor Ms. Merrys floor and the framing had rotted. So, with all of Ms. Merrys walls finally put back together and built stronger than ever before, I set about investigating this danged trampoline, as there was no way I was going to put 348 lbs of water on poor Ms. Merrys floor only to have the tank drop through the first time she decided to climb of Reds back. After a great deal of struggle, Mr. Ryobi the Saw and I cut out several peep holes in the floor so I could take a look into Ms. Merrys floor to find what the trouble was. The only problem was, every hole I cut, I only found foam! After a while, Mr. Ryobi the saw was screaming Enough, this old vinyl and plywood is hard for me to cut, you should using Mr. Milwaukee for this!, so I got out big Joe and his little buddy Five-Pound, to start ripping up the stubborn plywood and let Mr. Ryobis battery go and recharge. This is what we found:   No rot in the frame! Yay! Now, there is some water damage to the very thin door skin that covers the bottom, but it appears thats the only thing affected, and I can replace that later when Ms. Merrys got all her legs again and she can climb off poor Reds back and give him a rest. The plywood also wasnt rotten, or thin .. like every other plywood piece in Ms. Merry, it was 5/8 plenty thick. So, why was her floor so bouncy? I didnt find the whole reason until I spent several more hours with Mr. Ryobi, Big Joe and Five Pound. Turns out, poor Ms. Merrys floor wasnt built very well  . . Instead of properly securing Ms. Merrys floor every so often with cross boards, her floor was simply made up of four 2x2s running length-wise the entire span of the floor with only a couple of very loose 2x4 pieces up towards the front to stiffen it. You can see those in the pictures above. So, with no solid cross beams, the floor in the middle just bowed up as Ms. Merrys big rear end sagged down. Well, we couldnt have that! So, I asked the two Atwood brothers, Would you please lift up poor Ms. Merrys rear end so it straightens back out and I can fix her floor? Sure thing boss! But, youre going to have to turn us, you havent got us any power, yet! replied the Atwood brothers, who always love a chance to lift something big. So, out came the crank, and I got myself into quite a sweat spinning down each of the Atwood brothers until Ms. Merrys rear end had lifted just enough to straighten the floor back out. Once Ms. Merrys floor was no longer bent, I got out trusty Mr. Dremel and we cut out the old floor almost all the way back to the rear, removing the bent and twisted floor joists. After I had finished vaccuuming up the floor and pounding over the staples left from removing the center floor joists, I proceeded to cut new 2x6s to frame up the floor in the front to be strong enough to support Ms. Merrys new fresh water tank, and then several 2x4s to provide support for the dinette seat compartments where Ms. Merrys batteries were going to go. Finally, using a 2x6 and a 2x4, I rejoined the remaining portion of the old floor joists from the rear into the new framing in the front portion of the floor. My poor arms and Mr. Ryobi the Drill were both fairly sore after driving in all of those large screws to clamp all those new pieces of wood togther so theyd become super strong once the glue set.  We also got to cut our first pieces of insulation  , finally were putting things back together! , finally were putting things back together!Put down a bunch more glue on the top of all that new wood, then drop in the new sheet of plywood .   Driving in a whole bunch of two-inch screws and the front section of Ms. Merrys floor is done! ----------------------------------------------------------------- Well, that takes care of the front portion of the camper, Ill be able to replace the plywood on the rear section as soon as I remove the toilet from the bathroom so I can move the shower stall out of the way and tear out the last piece of the original plywood. When they built Merrys floor, they ran a full eight foot sheet from the rear straight up to the front, then a second shorter piece to complete the run, hence the 2x4s in the photo of the original frame structure. The outer edges of the overhanging section simply have small pieces of plywood added on instead of the rear being cut all from one sheet of plywood. With the new framing and the same thickness of plywood as the replacement, the new floor doesnt bounce at all and is quite solid. Next up, Ill be finishing the framing on the front wall so I can then insulate and close it up, allowing me to then build the framed box for the new fresh water tank and then ill have a step again so I can easily get up to the cabover and finish the floor. Once the cabover floor is in place, I can really start picking up the pace, first repaneling the ceiling up there, then installing the insulation and new quarter inch plywood to the walls in the cabover. Ill be returning to more my regular-style of writing for my following posts, but Ill probably continue to refer to the camper as Merry and my truck as Red, going forward, however, I think Ill probably stop giving characterizations to everything else, even if it was kind of fun . Till next time, Safe Travels . |
| Forum: General Discussion · Post Preview: #3106977 · Replies: 22 · Views: 66,236 |
| RedneckExpress | Posted on: Jun 28 2016, 05:31 PM |
|
Group: Members Posts: 42 Joined: 13-November 10 Member No.: 4,973 |
QUOTE(DA TOAD @ Jun 28 2016, 04:46 AM) I think my main concern, in forested country would be puncturing the camper with tree limbs. I had to trim up trees in my driveway to clear the 13' I need.  Depends on the road. A quick fix is to make a flexible pvc pole that you can break down and attach it out in front and go slow so if the pole or poles move. You can stop in time. Most Oregon blm/usfs roads are usually pretty clear, some of us carry a pole saw for times when it may be questionable. |
| Forum: Truck Camper Specs · Post Preview: #3106949 · Replies: 11 · Views: 106,572 |
| RedneckExpress | Posted on: Jun 27 2016, 06:18 PM |
|
Group: Members Posts: 42 Joined: 13-November 10 Member No.: 4,973 |
Don't know how far you are into your project, but Glen-L sells full scale blue prints for building truck campers, completely with a full list of all the materials you'll need. |
| Forum: Truck Camper Specs · Post Preview: #3106945 · Replies: 9 · Views: 147,624 |
| RedneckExpress | Posted on: Jun 27 2016, 06:16 PM |
|
Group: Members Posts: 42 Joined: 13-November 10 Member No.: 4,973 |
Forestry and BLM roads, mostly. The ones out in Lake County, Oregon were pretty close to jeep trails in some areas, had to creep slowly over rocks to keep from tossing the truck around violently. |
| Forum: Truck Camper Specs · Post Preview: #3106943 · Replies: 11 · Views: 106,572 |
| RedneckExpress | Posted on: Jun 27 2016, 04:29 PM |
|
Group: Members Posts: 42 Joined: 13-November 10 Member No.: 4,973 |
Thursday, June 23, 2016 Rebuilding the Amerigo Tale of Two Tanks Youve probably already noticed the new fresh water tank in a few pictures from the previous posts, but if you havent heres the new 41 gallon fresh water tank, temporarily sitting in her new home to check tolerances around the tank for plumbing that needs to enter the area.  With the 2x2 frame that I want to add to the inside wall of the campers tub so that theres insulation in that area, the water pump may actually end up by the water heater instead of on the floor by the tank. One thing I have decided is that since this tank has all the fittings on one side, and that shes a side entry, Im going to simply delete the gravity drain and do as I have to with my Heartland Fifth wheel, and use the pump to drain the tank when prepping her for long term storage. The second tank in this tale is the new waste tank. Here she is with all her fittings, waiting for me to finish the floor, and pull the shower so that the old tank can be dropped and the new one fitted into its place. That extra valve? Thats for the diversion setup. I had originally though about simply replicating how the KITs diversion setup worked. What made me think that might not be the best setup this go round is on the KIT the toilet dumped into the opposite end of the tank from the pipe and the valve. On this camper, the tank drains on the correct side, and thus the toilet dumps in directly ahead of the valve, so not the best place to be back filling the tank from. My solution? Add a third blade valve and an inlet on the upper side of the tank opposite the toilet and drain. When I want to run the grey water into the tank, close the valve down by the hookup and open the one on the side of the tank. This way the gray water enters the tank opposite the jon, and fills from the top. I will be replacing the original shower p-trap with a HepVo waterless trap valve as it will be exposed to the weather due to space restrictions underneath the overhang, where as the tank and the pipes will be getting enclosed and a small duct line from the new furnace directed down to heat the tanks during winter operations.   |
| Forum: General Discussion · Post Preview: #3106941 · Replies: 22 · Views: 66,236 |
| RedneckExpress | Posted on: Jun 27 2016, 03:49 PM |
|
Group: Members Posts: 42 Joined: 13-November 10 Member No.: 4,973 |
The shore power connector has new wire waiting inside and is all hooked up, waiting for the new distribution panel to go in and the vent assembly for the new furnace is in place.    |
| Forum: General Discussion · Post Preview: #3106939 · Replies: 22 · Views: 66,236 |
| RedneckExpress | Posted on: Jun 27 2016, 03:49 PM |
|
Group: Members Posts: 42 Joined: 13-November 10 Member No.: 4,973 |
Sunday, June 19, 2016 Rebuilding the AmerigoClose her up and install the other rear jack Finally able to close her back up, and start replacing some of the worn exterior components before stopping to give Merry a much needed bath, getting to the stage where I need surfaces clean for new hardware to be installed (like the roof a/c unit).   That line along the side of the wall is NOT the screw strip, thats 41 years of dirt and debris that was behind the screw strip that never received any sealant, the strip on the tail fin was the same way, but I had already cleaned it up and resealed it by that point. Sadly, I forgot to take pictures before I had to move the rig back into my drive way (new incoming neighbors, had to vacate the spare RV space  ), so forgive the fence in the picture, my driveway isnt very wide. ), so forgive the fence in the picture, my driveway isnt very wide.Start off with the drivers side rear jack. It probably looks familar, thats because this jack leg is actually going to be in that spot, I just need to replace the plastic head pieces with on it with the ones that came off the KIT, the electirc jacks are going on the Amerigo, but one of them has a failing set of bearigs in the acme screw, so Im reusing one of the spares that were on the front of the Amerigo to replace the leg and keep the motor and other useable bits from the original that was on the KIT.     Until I pull the shower stall out of the wall, I cant finish bolting it in place, so its not completely completed, but its six carriage bolts away from being done. Let me tell you, hand driving in eight 5/16, 5 1/2 long lag bolts with a hand socket, during a thunderstorm (one rolled in on me while I was sealing this corner back up) is all kinds of suck.  I have replacement black vinyl strips to go on all the screw strips, just havent started putting any on yet till I pretty much done with fiddling with the strips. Like to get on a roll with the heat gun and knock it all out at once (Got 200 feet of shiny black cover ready to go). In addition to buying new vinyl for the trim strips, you can also see that Ive replaced the fresh water fill port, the city water connector, the range good vent cover, and the tail light assemblies. The tailights was a bit of a trick given Monarch Lights hasnt been around in a while. Luckily theres a company called Grote, which manufactures all of the older parts still, so I was able to find a brand new set of exactly matching tail lights and all new marker/clearance lights. Best part? You can pretty much look any of them up by Grotes part numbers on amazon and theyre all prime .Still need to order the license plate assembly though, there, I may favor a newer metal one over the original plastic job which is falling apart. |
| Forum: General Discussion · Post Preview: #3106937 · Replies: 22 · Views: 66,236 |
| RedneckExpress | Posted on: Jun 27 2016, 03:46 PM |
|
Group: Members Posts: 42 Joined: 13-November 10 Member No.: 4,973 |
Much, much better
..   Whats the 2x6 for? To run 5 1/2 lag bolts into to tie the front edge of the jack bracket into, naturally  . Unlike the passenger side, where I literally could only tie in from one side due to the lack of space to over lap the corner, on this side, the jack doubles as the seal on the corner material. . Unlike the passenger side, where I literally could only tie in from one side due to the lack of space to over lap the corner, on this side, the jack doubles as the seal on the corner material. Since its going to be taking the twisting action of the jack there, and no door in the way, I added a 2x6 beam in to spread the anchoring load into and help tie it all together a bit better. Added in the missing 2x2s along the edge as well. Those go a long way into stiffening up those tail fins. With this side open, I was able to confirm that I have in fact, run out of dry rot, minus any discoveries in the floor, which from what I could see where the cut through for the drain pipes was, were in fine shape. |
| Forum: General Discussion · Post Preview: #3106935 · Replies: 22 · Views: 66,236 |
| RedneckExpress | Posted on: Jun 27 2016, 03:46 PM |
|
Group: Members Posts: 42 Joined: 13-November 10 Member No.: 4,973 |
Sunday, June 12, 2016 Rebuilding the AmerigoHavent we been here before? Having had to put the cabover on the back burner to get the floor done, which required finishing the demolition of the cabinets on the driver side, I seem to have come back to where I started, with the rear of the camper opened up and another wing rotted, and a 2x4 the consistency of florists foam.  Hrm . something seems to be missing here .. cant quite put my finger on it ..   All the beam you see missing? I pulled that with my fingers. Im amazed that wall hadnt buckled. The 2x6 pieces running above the 2x4 were probably the only thing holding it together, and I pulled those out by hand as well .   Yup, just a bit of water intrusion . The electrical cord connector came through here  There we go, thats better . And no, the top beam is quite solid, thats just surface staining.    |
| Forum: General Discussion · Post Preview: #3106933 · Replies: 22 · Views: 66,236 |
| RedneckExpress | Posted on: Jun 27 2016, 03:43 PM |
|
Group: Members Posts: 42 Joined: 13-November 10 Member No.: 4,973 |
Sunday, June 5, 2016 Rebuilding the AmerigoMore work on the bed Got some more work done on the bed, finished clearing out the cabover floor with the help of the missus (She found ripping it out to be very cathartic  ). ). The new bed platform has been partially assembled in a dry fit, but wont be able to be installed until I finish some other areas first so I can rebuild the front step and safely get in and out of the cabover area. At current, my only method of ingress and egress is to wedge my foot by the water heater or the propane compartment and try to swing my 350lbs up onto a very small ledge and not miss and go through the cabover skin. I am still debating if I want to simply cut two layers of my very expensive foam board to go under the mattress or use the faced roll of bat insulation I already have on hand to under the mattress and fill all of the air gaps present between the top of the bed floor and the skin of the camper. The rigid foam board would only fill in the space between the framing, still leaving the large gap underneath, where as the fiberglass would fill the entire space.     Once the tank step is partially assembled, I can use it to get up and dry fit the new floor, which will over hang the edge inside the camper by about four inches, adding the missing length needed to make the cabover bed area large enough for a standard queen sized mattress. Because the original floor frame design was poor and the over zealous use of spray foam by Gardner in 75 (They seem to have taken the approach of, Weve got a new toy! Lets Foam all the things!), I had decided to build a second frame that would be anchored on top of the original, giving us 2x3 framing under the mattress and a solid beam across the front of the cabover near the window to keep the bed frame stiff and properly load bearing. You can see in the photo below the 2x3 that will over hang the exisiting front edge of the cabover floor so that I can suck it up tight against the new floor and anchor the two together from two different directions.  Once the all the frame members are dry assembled and the new platform is test fit, it will be glued together permanently. Then the 2x4 front sill and stringers to go from the front edge of this frame under the shelf by the front window will be attached and the whole unit will be glued and screwed permanently into place. |
| Forum: General Discussion · Post Preview: #3106931 · Replies: 22 · Views: 66,236 |
| RedneckExpress | Posted on: Jun 27 2016, 03:41 PM |
|
Group: Members Posts: 42 Joined: 13-November 10 Member No.: 4,973 |
In addition to these tie ins, theres a reason for that plate that hangs down over the side the truck. To help with the lateral stress where these jacks attach, two of the original jack mounts were modified so that they will bolt flush through that plate and transfer part of the jack load into the underside of the wing, just as they did when the camper was originally built.  Missus waiting on the steps for me to put the camera away and go in for the night.  And done! The door now shuts square, the siding doesnt have a dent in the lower part of the tail anymore (sadly has a couple new dents up at the top from where the siding had been buckled from the rear sag that I repaired), and the camper no longer makes an ominous creaking sound when I climb up and down the stairs  . .  |
| Forum: General Discussion · Post Preview: #3106929 · Replies: 22 · Views: 66,236 |
| RedneckExpress | Posted on: Jun 27 2016, 03:40 PM |
|
Group: Members Posts: 42 Joined: 13-November 10 Member No.: 4,973 |
Sunday, May 29, 2016 Rebuilding the Amerigo Fix more rot, and first rear jack is installed Rot, just when youve thought you found all of it in an area, you find a bit more  . . In this instance, it actually wasnt alot, the bulk majority was in the bottom three inches of a board, the downside is said board was also key to tying the floor into the rear wall. Didnt help that in my process of trying to remove the corner 2x2, I broke the one it was joined to and ended up having to replace both .. So, off came the siding on the rear of the wall, mercifully it was two pieces, out came the glued together threesome of 2x2s (not sure why they did that, discovered they didnt even do that on the other side when I worked on it), and sadly, also out came the corner board of the rear wall, because it snapped in two when I was trying to separate it from the corner pieces. Ended up replacing it with a single 2x6, again not understanding the supposed cost savings of having to have someone cut three pieces of 2x2 and glue them together, vs cut one 2x6 once, and glue and screw it in .. Before tying the rear wall and the new corner back together, I jacked the camper up using the new jack on its bracket to put a piece of 2x2 underneath and then lowered it back down to use the campers own weight to help lift the floor back up and get rid of some of the butt sag.     Also made another Wheres the Wood? discover in this corner, as it appears that in 75 to save money, Gardner decided to just laminate in scraps of 5/8 plywood to use to anchor the screw strips along the outer edge, and then slap in a couple scraps of 2x4 using two-hundred staples along the edge to use for the seam between the siding and where the patio light went. In 1974, there was 2x2s behind these areas, in 1975, just the chinzy plywood. So, I added in some 2x2 scraps I had left over to give me something substantial to tie the siding back into, as well as to anchor the screw strips in on the seams. Extra plus, it got rid of a dented in spot in the siding that occured because there was nothing backign the siding.   The skirting around the stairs was toast, the plywood was rotted beyond any idea of salvage, but was still solid enough to trace onto a new sheet and cut out its replacement. Come to the realization that on this camper, if its plywood, it will all be 5/8 thick. Bout this point, I installed the carriage bolts through the 2x2 on the right side of the door jam to tie in the new jack bracket. It also bolts through the new framing in the upper side wall where a 2x6 and 2x4 carry the jack load all the way up to the main header beam at the top of the wall. |
| Forum: General Discussion · Post Preview: #3106927 · Replies: 22 · Views: 66,236 |
| RedneckExpress | Posted on: Jun 27 2016, 03:37 PM |
|
Group: Members Posts: 42 Joined: 13-November 10 Member No.: 4,973 |
On the Passenger side, the extra 2x2s are not present and theres no tapered piece at the front corner, instead the paneling on this side goes all the way down to the bottom of the frame.    Then, dont get me started on the bed platform design Really, who thought hanging a small piece of paneling from the edge of the unsupported 2x2 that makes up the front frame for the bed floor to another piece of paneling attached to the underside of the window shelf was a good structural idea?! Again, theres major differences in the two model years, in Wagonqueens unit, the fiberglass is bare, and its easy for them to add additional framing underneath the existing bed frame. As you can see in the photo below, in mine they decided to spray in expanding foam and glass in bits of plywood here and there.  There really isnt any room on the underside to add more framing to properly stiffen the bed frame, so the end solution is going to be to add additional 2x4s/2x2s to the side wall frames, then build a second 2x2/2x4 based bed frame that will go on top of the existing one, and stiffen and sandwich the two together, make the bed platform 3 thick instead of 1 1/2 thick. It will also allow me to extend the bed frame all the way up under the window shelf like it should have been, and extend back an additional several inches inwards into the camper to make it possible to fit a queen size mattress in the cabover. My plan is to fully enclose the cabover area, with just a small entry spot near the fridge. I havent decided on if we want to make a curtain or some kind of hatch for this, and that will likely be something added later, for now, it will simply be an opening just a little wider than the fully opened fridge door. The fridge is being shifted back several inches, and in the process shortening the dinette some, to both center the fridge on the access door, and to center its fins beneath the roof vent, both of which were heavily off set before. And, now youre up to date  . . |
| Forum: General Discussion · Post Preview: #3106925 · Replies: 22 · Views: 66,236 |
| RedneckExpress | Posted on: Jun 27 2016, 03:37 PM |
|
Group: Members Posts: 42 Joined: 13-November 10 Member No.: 4,973 |
Much thanks to my neighbor, Robert, who actually did the removal and reinstallation of the wing. This was a late sunday find and with it all unbuttoned and rain in the forecast, it was a race against the devil to get it done and closed back up in time for the weather to go to pot again. One thing we did discover was when the Amerigo was built, they were using longer than eight foot sheets of plywood to build it. I took a page from the KITs design as a solution. The wing is now made of two sandwiched and glued (With 3M 5200), sheets of 5/8 plywood. The seams are staggered so that it makes one solid sheet and givesi the necessary rigidity needed. I will likely add a second sheet onto the drivers side as well to give both sides some extra durability.  Sorry for the mess, but Im running of places to stick bibs and bobs as they come off the camper, so, its kind of a migrating mess in the Amerigo right now. Since the corner wood was rotten as well, I took this opportunity to properly rebuild the front corner (will do the same on the other side as needed) using 2x6s in the lower area where the jack attaches and extending the loading all the way to the top beam using added in 2x4s to make the frame strong enough to handle corner jacks.    I did the same in the rear where my custom rear brackets will attach, to carry the load through the main frame (I still need to cut and install the 2x4s that go above it).  Demolition is coming along well, other than I have an utter hatred of the double cresent security screws that the entire camper is put together with.  Other than the wing, I havent found any major rot, however, now that I am digging into the cabover, Im finding instead of rot, evidence that the camper was either: A.) Assembled starting on a Friday and finished on a Monday B.) At some point had to have some repairs done during warranty at a dealership that didnt know what they were doing. First off, looking at WagoneerTrucksters 74 during their remodel and looking at my 75 which is the exactly same model, one year newer, its obvious that Gardner Industries started cutting ALOT of corners. Theres several areas where less framing is present, in the case of the cabover, pieces of framing are missing all together. Wagonqueen Trucksters 74 factory framing (From her blog, Amerigo Truck Camper Restoration - Uh oh, What did you do?)  75 Amerigo Factory Framing, notice the difference?   On the drivers side, there are 2x2s that are installed that go all the way out to the edge of the cabover, tapered to fit the curvature of the nose cap. The wall paneling on this side is attached to these 2x2s and stops flush at the cabover floor. The window is framed with a different breed of wood and is assembled using the wide gauge staples that were common in alot of other truck camper brands during that era. No where else in the frame of the Amerigo are these staples present, just this one windows frame out (Which I plan to tear out most of and redo).  |
| Forum: General Discussion · Post Preview: #3106923 · Replies: 22 · Views: 66,236 |
| RedneckExpress | Posted on: Jun 27 2016, 03:35 PM |
|
Group: Members Posts: 42 Joined: 13-November 10 Member No.: 4,973 |
Wednesday, May 25, 2016 Rebuilding the AmerigoCall me Fix-it Felix! Well, thats two movie references so far, wonder how long before I run out of puns as I continue my work on rebuild the Going Merry. Since my last update, the camper pretty much sat on the back of the truck, under a tree in my drive way through pretty much all of the winter. Alot of the winter months involved me having trouble doing little else on my weekends except sleeping, between work stress, holidays, and not getting enough sleep week in and week out, the poor Amerigo sat untouched until this month. Ive done more in the past month than I had in the past five. So, to start off where I left off, I continued into my demolition of the cabinets and wall paneling on the passenger side of the camper. After I finally got the stage where I could remove the propane compartment and the cabinet housing the fridge, I made my first rot discovery. In this instance, it wasnt so much as finding the rot, as it was finding the rot that the previous owner had found and had tried to fix without a whole lot of success. I quite literally was able to grab hand fulls of the plywood and pull it out like a handful of potato chips. The patched in piece of 2x4? Came off in my hand where it had been epoxied in place. So, time to just get rid of the whole beam and replace it with a new one . Out with the old .  In with the new    |
| Forum: General Discussion · Post Preview: #3106921 · Replies: 22 · Views: 66,236 |
| RedneckExpress | Posted on: Jun 27 2016, 03:28 PM |
|
Group: Members Posts: 42 Joined: 13-November 10 Member No.: 4,973 |
Now, all I need is the grill work off a vintage Dodge Adventurer package truck and Ill start looking like the Dodge on the Amerigo brochure  . . (Brochure from Pirate4x4.com, photos belong to SwampFox89@aol.com)     Looks like enough demo for one day . |
| Forum: General Discussion · Post Preview: #3106919 · Replies: 22 · Views: 66,236 |
| RedneckExpress | Posted on: Jun 27 2016, 03:28 PM |
|
Group: Members Posts: 42 Joined: 13-November 10 Member No.: 4,973 |
I can tell, sadly, that some water is getting around the points where the running lights connect, so I think I may go the smart route and replace them all, hopefully with a unit I can permanently seal the base to the fiberglass so that theres no future worry about water penetration.    The first sacrifice from the KIT, its nice new Suburban 6 Gallon water heater for the Amerigos older Mobile Temp. I have the new counter top material in storage at a familys place, as its the same thing as what the Formica counter looks like, butcher block. Lumber Liquidators had a wonderful deal on an 8 x25 deep section of 1 1/4 thick oak unfinished counter, so I decided to upgrade to something slightly better than the particle board and Formica counters that were sagging in the middle. With the two large openings in the counter top for the range and the sink, going to the solid wood counter wont contribute enough additional weight to be of much concern.     Added another vintage touch to the Express, got a set of cherry Dodge dog-dishes off a 1974 Dodge motorhome out in Ellensburg, WA (seems this project keeps taking me back up to Washington .) |
| Forum: General Discussion · Post Preview: #3106917 · Replies: 22 · Views: 66,236 |
| RedneckExpress | Posted on: Jun 27 2016, 03:27 PM |
|
Group: Members Posts: 42 Joined: 13-November 10 Member No.: 4,973 |
Signs of a past leak and repair. The dark spot on the plywood is an old stain, and is sealed with epoxy and is quite solid. A section of new 2x4 was grafted in by the previous owner most likely. It is solid, but I will buttress a full length of 2x4 on top of it to add some extra structural strength.     With the wall paneling removed, you can see the silly lopsided offset of the fridge compartment as it came from factory. Im going to shift the fridge towards the rear enough to make the cabover a full queen, which will in the same move center the fridge underneath the roof vent and to the exterior hatch. The propane compartment will not move, but I may be able to gain a little storage compartment along side it to use for storing things like baking sheets and what not. The dinette likely wont be serving as a bed when the remodel is done, at least not for tall people.  I didnt notice it until I removed the build up the last owner had done over the old dinette wall that there was a little piece of paneling over a hole cut in the wall from factory. When I opened up the wall, I discovered the little piece of panel was covering an access to the tie down anchor, which goes clean through the plywood wing and the 2x4 sill board at the bottom of the wall. A lot better anchor strength than the KIT, whose anchors simply went through the plywood and a 2x4 that was attached to the underside of the wings.     |
| Forum: General Discussion · Post Preview: #3106915 · Replies: 22 · Views: 66,236 |
| RedneckExpress | Posted on: Jun 27 2016, 03:27 PM |
|
Group: Members Posts: 42 Joined: 13-November 10 Member No.: 4,973 |
Main beam above the Snap-N-Nap is still solid and I have confirmed that when my unit was built that it was indeed built with glue and screws, as theres four counter sunk screws holding each one of the 2x2s in place. No staples on this campers frame, just on the inner paneling, most of which is going to wind up in a dumpster.    Looks like at one time there was a power vent here, makes installing the Shurflo Comfort-Breeze even easier  . . Ah, looks like I did find one potential fib by the last owner, there was in fact at one time an Air Conditioner on this camper. The original wiring for it was cut off and tucked up inside ceiling, I did a test on it and confirmed that the wire is not connected to anything, so there was never any danger, it simply was disconnected and discarded. Ill likely use the old wire to help pull a new line in. I can tell by the doubled up roof timbers that where the skylight is where the A/C was. I was surprised to find the skylight is framed in with 2x4s Now Im drawn, do I want to keep the skylight, or restore the factory framing and put my A/C unit back in place there instead of making a new opening?   Precusory check on the cabover roof at a primary leak point, no immediate signs of any water penetration, ever..  Cabovers doubling as temporary storage for loose bits till I finish removing the cabinets so I can carefully remove the wall panels to reuse as templates and to check around the side windows for any leakage signs.  |
| Forum: General Discussion · Post Preview: #3106913 · Replies: 22 · Views: 66,236 |
| RedneckExpress | Posted on: Jun 27 2016, 03:26 PM |
|
Group: Members Posts: 42 Joined: 13-November 10 Member No.: 4,973 |
Saturday, November 21, 2015 Rebuilding the AmerigoJust call me the Demolition Man! Finally, an update! Been wasting a lot of weekends as of late, mostly sleeping trying to make up for too little sleep during the work week, but finally progress has been made and wonderful discoveries as well .The good news, first. The frame of the camper is in excellent condition. Ive discovered only a couple spots where water entry has (and still is, but now that I know where it is, I can fix it ) occurred, but the only casualty was the ugly as sin ceiling paneling which I had planned to tear out anyway.The bad, the bloody leak area is over the top of the blasted clamshell bathroom, likely been coming in around the tiny roof vent. So that means Im going to have to figure out how to separate the bathroom into its two pieces without damaging it. Yay . I had already planned to upgrade the vent opening to a full 14x14 opening, so I guess this is as good an incentive as any, perhaps now is a good time to look into the new holding tanks, since Im going to removing the flange for the toilet anyway so I can move the shower. The rear vent is showing signs of leakage as well, but no major damage to the frame. Woods still solid and once it dries I can treat it with Minwax wood hardener to protect it from any future moisture exposure.   Bottom edge of the wood is damp, but the wood has not rotted, most of the dark areas are bits of the old roof board after it being removed. The wooden ceiling material is damp all the way across the top of the bathroom and right around the vent, which follows the path that the camper leans at when its parked next to the house. I continued to demolish the ceiling and wall paneling moving forward, finding nothing but good news. Also realized why my Amerigo has no rear ladder, when so many others Ive seen do. Theres no plywood under the fiberglass roof. It seems I cannot fail to buy a truck camper with a roof not-designed to walked on .Good to know, since I plan to attach a Winegard Antenna assembly.    |
| Forum: General Discussion · Post Preview: #3106911 · Replies: 22 · Views: 66,236 |
| RedneckExpress | Posted on: Jun 27 2016, 03:24 PM |
|
Group: Members Posts: 42 Joined: 13-November 10 Member No.: 4,973 |
Saturday, September 19, 2015 Pirates and Truck Campers Well, the Amerigo is officially mine and happily rests on the back of my trusty old Dodge truck.  I sit, preparing to enjoy my victory dinner at the Lacey Rock, Wood Fired Pizza and Spirits, chuckling at the fact that I took possession of my new ship on the annual Talk like Pirate! day. In fact, Ive found it so funny, that Ive decided to let my inner nerd out to play, and have chosen a fitting name for my new ship  . . For those that are familiar with Japanese Anime, theres a series specifically about pirates, goes by the name of One Piece . Ironically, the brand of my new camper is an A-Mer-I-Go .. Those that know the show should be screaming by now, cause they know where this is going And the name of the main characters ship sounds very, very similar  So, without further adieu, I give you, THE GOING MERRY!       Arrrr! She be a fine ship, her keel be strong and she sails the asphalt seas as smoothly as a fair maidens skin! ..Ehem .. Couldnt help myself. After driving her from Spanaway down to Lacey, I can say she rids on the back of the truck like a dream, that beautifully rounded cab-over slices through the wind far like a knife! First time I actually managed to maintain 55mph going up a grade on I-5 .. Granted, that might change after shes had some remodel work done, but so far she rides like a dream. At current shes using a kludged power cord to drive the signals and running lights, but that will hopefully change soon as the next paycheck rolls around so I can invest in some new wire to get her properly wired up. Weve got a long worklist ahead of us, but I cant wait to get back to camping! |
| Forum: General Discussion · Post Preview: #3106909 · Replies: 22 · Views: 66,236 |
| RedneckExpress | Posted on: Jun 27 2016, 02:56 PM |
|
Group: Members Posts: 42 Joined: 13-November 10 Member No.: 4,973 |
All of the plumbing has been redone with properly installed PEX water lines.    The rear snap-n-nap bed is a one piece fiberglass and aluminum framed construction with sprayed in foam insulation (way ahead of its time in 1975). The quilting is made of vinyl or pvc plastic, and I suspect, will get replaced with FRP paneling or possibly wood. The hinged sides will be taken apart and foam board will be sandwiched into the middle, at which point well reface them with FRP, or take a page from another Amerigo owner and recover them in marine vinyl.   One thing I noticed about the Amerigos and love that this one still has (and that Ive located the truck side for) is a Phillips Radio Inter-Com system .  |
| Forum: General Discussion · Post Preview: #3106907 · Replies: 22 · Views: 66,236 |
| RedneckExpress | Posted on: Jun 27 2016, 02:55 PM |
|
Group: Members Posts: 42 Joined: 13-November 10 Member No.: 4,973 |
Well likely end up adding a second opening between the vent in the rear and the skylight to allow for the installation of a standard roof-top A/C unit, as the current owner has already upgraded the wiring in the unit to 30amp service, with a very nice marine twist lock plug.    Space-wise, in terms of floor space, the KIT and the Amerigo are fairly similar, the big differences being the floor plan and the fact that the Amerigo has a rear snap-n-nap, which adds a third bed (full size), oh and the two piece clamshell solid fiberglass bathroom that has a toilet that I can actually SIT ON without having to make major renovations, my one big beef with the KIT, I could never truly dry camp because I couldnt comfortably sit on the john because the bathroom was too small. One of the first things we plan to do is shift and/or shorten the dinette by about 4-5, so we can extend the cabover bed back a little ways to allow it to fit a full queen size mattress (the mattress platform is 46 1/2 wide). The fridge compartment door will still be perfectly aligned, as the inner wall paneling actually over laps it by a good 3-4. The KITs bed actually already does this, so well simply be recreating some more of the KITs floor plan. The lower kitchen cabinets and probably the upper cabinets as well will be modified (and possibly refaced with kreg-joined solid oak pieces, similar to our Bighorns Kitchen). The current owner has refaced a good part of the camper, which is why you see all the nice oak grain, the original wall paneling is the classic dark 70s wall board you commonly find in most similar era truck campers. The yellow wallboard tacked over the top of the original wall paneling as a back splash for the kitchen is also going, and the range will likely be swapped out for the one in the KIT, as while its stainless steel like the range hood, its also fairly rusty inside, though the gas valves may prove to be useful. The furnace is original, its a very early NT series style Suburban furnace, and is pilot lit, instead of electric spark ignition like modern units. The fact that it still looks brand new tells me this camper really never saw any winter use. Well either replace it with the KITs furnace, or if theres funds enough, simply buy a new NT Series unit. |
| Forum: General Discussion · Post Preview: #3106905 · Replies: 22 · Views: 66,236 |
| RedneckExpress | Posted on: Jun 27 2016, 02:54 PM |
|
Group: Members Posts: 42 Joined: 13-November 10 Member No.: 4,973 |
Sunday, May 31, 2015 A tale of Two Truck Campers - End of the KIT's road Well, life is an interesting thing, and in this case, a rare find plopped into my lap not too long ago when I put up a Craigslist ad looking for Amerigo parts for my planned rebuild. In this case, it came in the form of a 1975 Amerigo 11'6" Snap-N-Nap up in Puyallup, WA, and no the silver Dodge its sitting on is not mine  . .The current owner has had it for roughly sixteen years, and has done several modifications to it already, including updating the power panel in the unit to a modern one, adding electric jacks to the front and building some very nicely done steel corner brackets that bolt both through the corner and sandwich with a steel plate on the inside as well as bolting through under the wing. The camper has spent all of its downtime under a carport cover so that it has stayed out of the bulk of the Northwests weather, and hasnt been used in the last several years as the her current owners have upgraded to a GMC Kodiak and a custom made Chalet Truck Camper. The similarity of this tale to how the KIT was when I first found her is not lost on me.  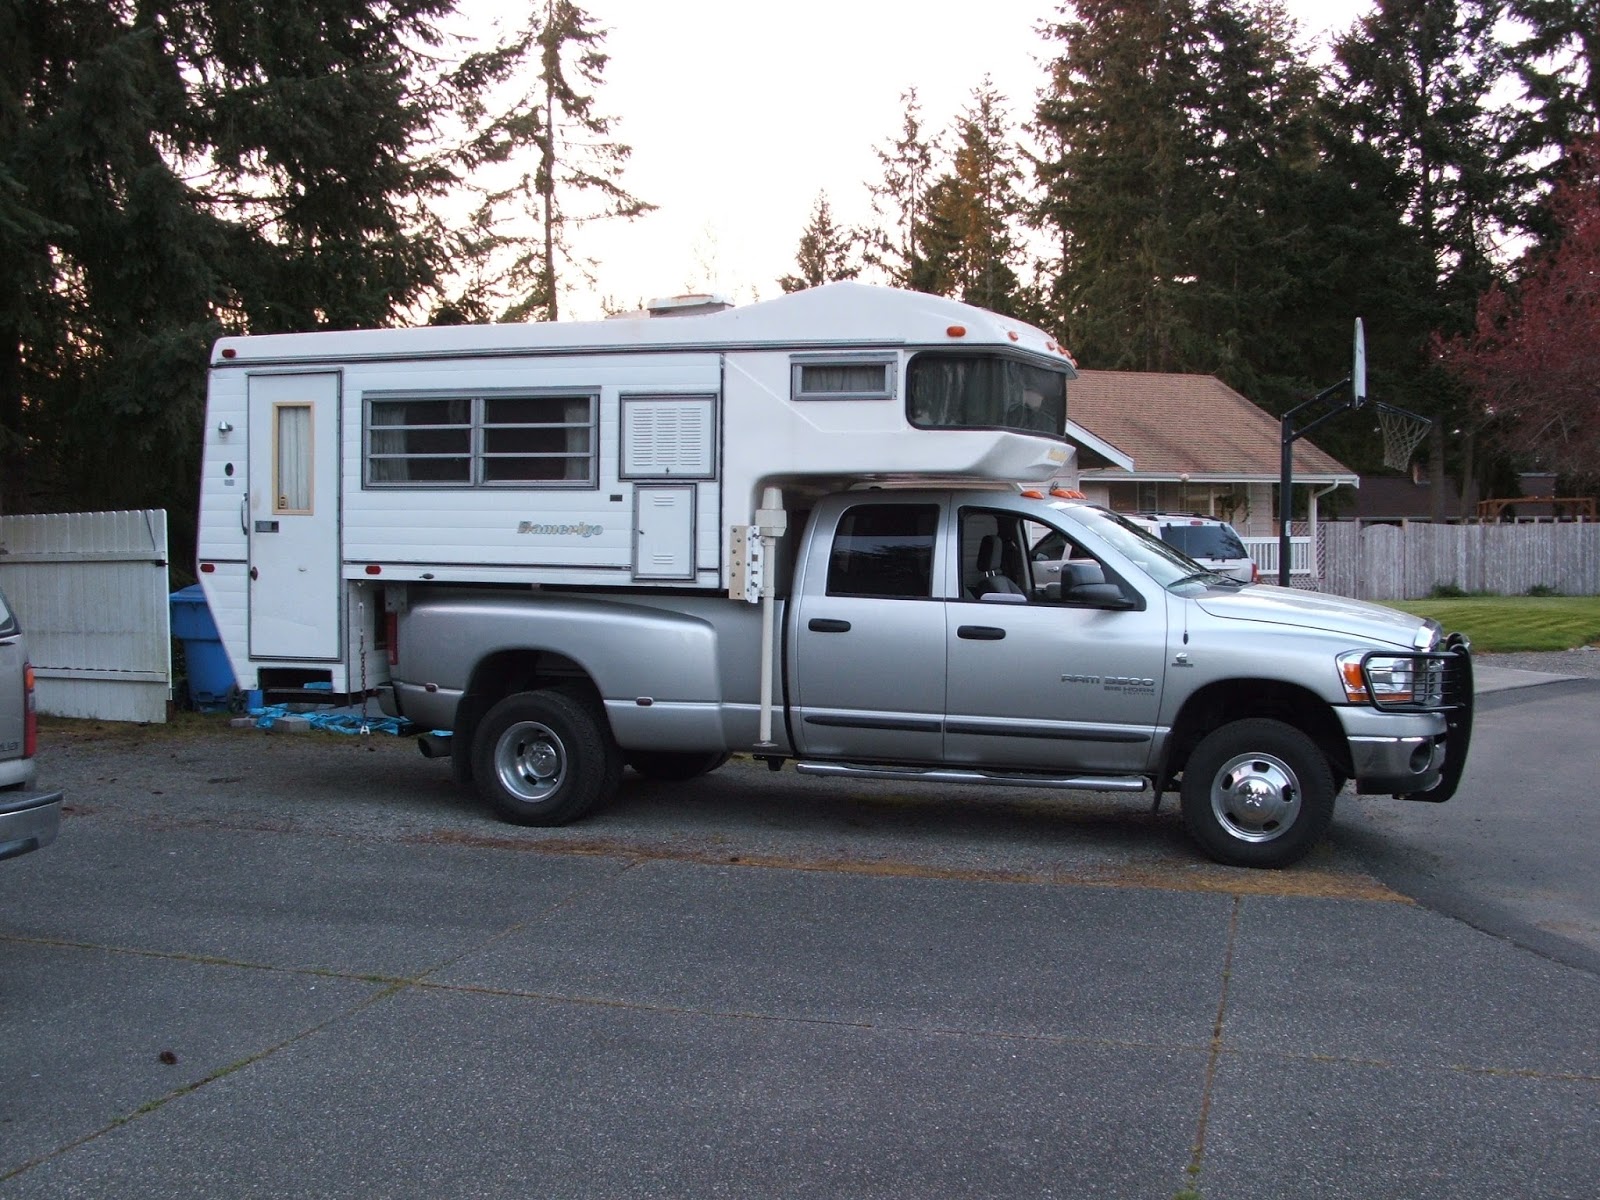 Having made the trip to give it a good inspection, Dawn and I decided that wed be able to get what we wanted in our remodel of the KIT by simply buying the Amerigo (ironically for the same amount as what we bought the KIT for nine years ago  ), and restoring it. ), and restoring it. Fortunately, the current owner is willing to hold onto it for us for a couple more months whilst we raise the funds really quick to make the purchase, as our savings was run down with a recent batch of dental surgery I had to undergo. One of the first things I noticed is that he added a nice center aisle sky-light. In most Amerigos, theres a vent roughly where the forward end of the skylight is, and thats where the A/C unit is installed. |
| Forum: General Discussion · Post Preview: #3106903 · Replies: 22 · Views: 66,236 |
| RedneckExpress | Posted on: Jun 27 2016, 02:45 PM |
|
Group: Members Posts: 42 Joined: 13-November 10 Member No.: 4,973 |
This is the tale of me and my restoration project of a 1975 Amerigo Snap-N-Nap Truck Camper. As of the start of this thread, the restoration is still ongoing, with a fair number of the larger items having come from Adventure RV several thousand miles west to little Sauvie Island on the columbia river. Rather than flood the forum with multiple posts, I will be adding the subsequent updates as replies to this thread. Hopefully, this is the best fit, forum-wise, as I noticed there does not appear to be a Projects area on this forum. If the first post remains editable, I will create a table of contents here for each of the major chapters to reduce scrolling. Table of Contents
|
| Forum: General Discussion · Post Preview: #3106901 · Replies: 22 · Views: 66,236 |
 New Replies New Replies No New Replies No New Replies Hot Topic (New) Hot Topic (New) Hot Topic (No New) Hot Topic (No New) |
 Poll (New) Poll (New) Poll (No New) Poll (No New) Locked Topic Locked Topic Moved Topic Moved Topic |
| Lo-Fi Version | Time is now: 28th April 2024 - 10:24 PM |